
Let's Do Some Learning- Volume 1: Composition
- danihansenphoto

- Dec 27, 2023
- 8 min read
Hi there!
Tonight I was thinking it would be spicy to share my knowledge on composition. This is a big focus of mine. I think you'll find some good pointers from my experience, but all of this is mostly just my opinion. There are many more experts out there on this topic, but I wanted to give you some ideas that I've found helpful. I do think that some humans are given a natural ability to see composition, and others just can't quite grasp the art before them and how to arrange it. Using these tricks and tips might assist those who struggle a bit with capturing what they desire. These photos are from my time with my clients and from my travels. Putting this together took a little time, but it was neat collecting all these examples from the past. The photos are from Norway, Germany, Hungary, California, Arizona, Iowa, North Carolina, New Mexico, Colorado, Montana, Idaho, Missouri, Utah, and South Dakota which is just wild. Collecting this knowledge to share with you has taken me all over the world. Life is amazing.
Alright let's get into it...
I've never been a big fan of rules. Rules in the arts have always seemed a little odd to me because art is subjective, and the perspectives across the planet are all different. Therefore, who says art is art? Who says which rules you should follow? Who says which rules you can break? Who decides what makes a photo art? Is every photo art?
So many questions, eh? I never got a degree in the arts, but I loved my art classes in my younger days. In my journey to become a photographer I went through books, stalked Instagram accounts, watched so many videos, listened to podcasts, found inspiration, paid for a mentorship, went to some styled shoots, and mostly connected with hundreds of people to share moments together. To answer some of those questions, I am using the last seven years of my experience. You can break any rule you want at any time you please, but the general guidelines are helpful to start learning photography. Any photo is art if someone appreciates it. A moment in time seen from the eye of the person who took the photo. I take a lot of junk photos, that's part of the process. Sometimes your ideas backfire. Sometimes they make you jump outta your chair because you nailed it. That's what makes it worth it.
Let's start with a rule I follow frequently. The rule of thirds. This is basically taking the landscape or the moment and putting it into three sections to balance out the photo. Or this could also mean including three items in a certain way. Three is the magic number, and our eyes enjoy the balance of thirds. This rule is one of the first I learned on composition. I'll provide some examples of where I feel I've used this rule to give context. This is a very general idea to follow, but it helps me break the scene down in my mind. Start simple.


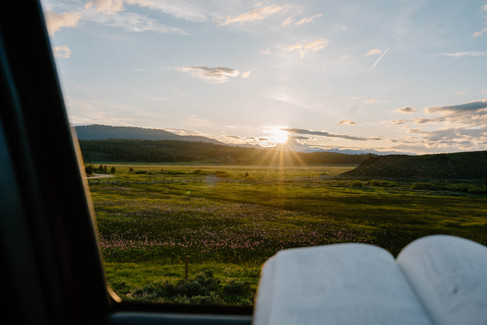
Next up is something I once heard Anni Graham say: avoid putting the horizon line in the center of the photo. I will say I think I disagree with this at times, but by avoiding this you will take more unique photos. Starting from the middle of the horizon is an average Joe move. By moving the horizon around to provide different balances to the image it will make it have some pizzazz. Here's some images for context on this. I'll even provide ones where I broke the rule so you can see it's still a good photo, but also not as exciting. Another idea behind this is just putting the image in the center. Sometimes I call these the "fridge photos" or the "picture frame photos" where your just standing and smiling. During weddings I do portraits like this, and they will never be my favorite. Just the truth


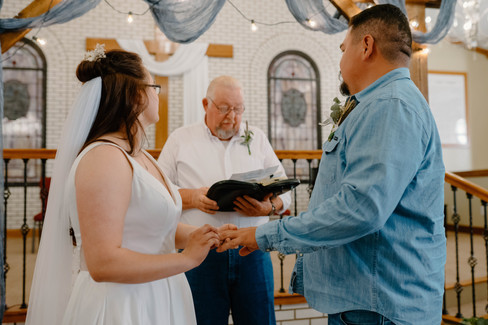


These images are considered times that I used the horizon line or the subjects as the center of the image. While these images are all still so beautiful to me, the point I'm trying to show is that they are not necessarily the most creative in their composition. Following the basics in these photos. You might also notice how these feel very "rules of thirdsy." There is overlap with the concepts for sure.


I hope you can see here how moving the horizon line makes a huge difference. These images tell stories in my mind. Moving around while photographing people is the best way to stay off that center line. The image of the lighthouse does have the subject as the center, but by pulling down that horizon line it still provides a scene that feels unique. This is sort of why I said the rules are made to be interpreted. Try not to overthink it.
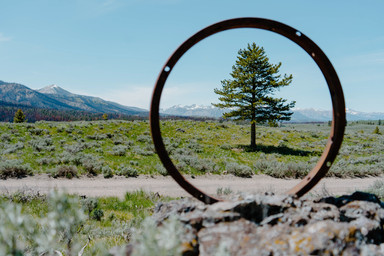
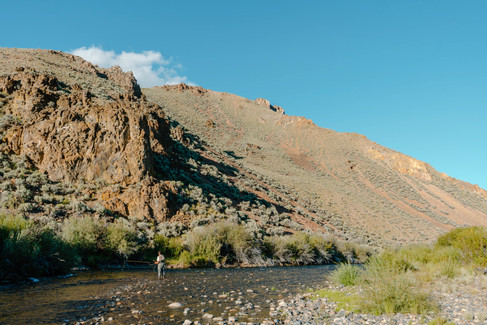
Something that I wouldn't consider a rule, but more of an idea, is to use something to frame the image in the foreground. Taking a branch, or a doorway to add depth to the image makes a huge difference. This is where you'll find yourself thinking, "Dannnggg, maybe I am an artist." I'll include some ideas for this too. Getting out into nature is a great place to practice this.
The next two photos were taken near Ketchum, Idaho on the Wood River. Here's a prime example of how using this tactic really amps up your image:


More examples of using foreground items, just for fun:


Another idea that I love to use is the concept of blur. Life is a blur, ain't it? Why not make some images that show the movement of life through them? This can be so fun. If you're up to speed on knowing your settings, I'll give you some intel on how to do this. It really is all about shutter speed. You want a slow shutter speed. Start with something like 1/30 to start. If that isn't delivering, feel free to lower it. Capturing a wedding reception dance with some movement and blur gives the photos life. The other way to achieve some blur is to have your subjects be out of focus. You could focus on the background, the foreground or something unique to the situation to play with this. Cameras with good autofocus sometimes make this tricky. On my Sony A7IV I have to push the shutter button halfway down then snap the photo when I find the focus I like. Patience is key.


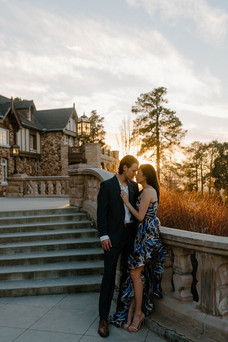
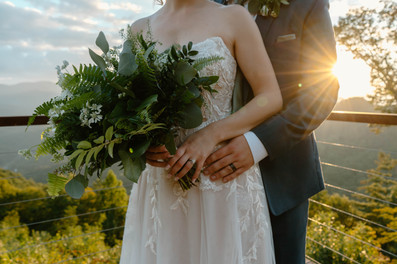
One of the last composition concepts I'd like to share is the use of the sun. That big fiery ball in the sky can help make some B E A utifiul photos with a little practice. A lot of the times you'll have people tell you not to shoot into the sun or take photos when the sunlight is harsh. These are definitely rules I break. I had someone once tell me they only shoot at golden hour or in the early morning for best sun, and while I respect that for your clients, for your personal art I think you should experiment. I also recommend using natural window light when you can. It gives a nice golden effect too. Even with your clients it can be fun to shoot with bright sun. I do recommend using golden hour as a starting point. Usually this is the last half hour-ish before sunset. I'll share some examples of using golden hour, and shooting in harsh sun. I also love to wait till the sun has set to take photos too. This is called blue hour. Your photos start to carry cooler tones as the warm sunlight sinks down below the horizon. I'd snap some pics at this time too. Might need to crank your ISO up a bit during blue hour.
Golden hour examples first:


Next up we have some blue hour examples:
P.S. The photos of Lake McDonald in Montana are some of my favorite blue hour shots ever.


Harsh sunlight and window examples:


Next up: find some inspiration. Get on the internet and start looking for photographers who style speaks to you. Whatever you like to photograph or what catches your eye, start with photographers who do that work. "Give it a Goog." I follow a bunch of photographers on social media who I think absolutely crush the game when it comes to composition. These photographers provide inspiration for me, even if their styles are completely different than mine. I also think finding artists who paint has helped me along the way. I think some of my landscape photos look like paintings, and it makes me smile. Something about the composition and the colors makes it feel this way. I will list out some of my inspirations for various concentrations of photography and post their websites. I am personally heavily influenced by Ansel Adams work from his books. I've traveled to many of the places he has, and hope to continue to more. I find his composition makes you feel as if you're seeing the scene ~almost~ firsthand. I gathered many books of his to reference periodically.
Behind Ansel Adams is Jimmy Chin. This guy is a true visionary. As far as landscape and adventure photographers go - he is one of the best. Absolutely mind-blowing work, and talk about a composition guru. He takes the tallest peaks in the world and uses them to create breathtaking imagery of the greatest outdoor pursuits on the planet. Photographing the most impressive athletes, while participating in the adventure himself just amazes me to no end. I was gifted his book "There and Back" by a someone who inspired me to pursue a life of passion. In this book, I learned he had skied off the face of Everest and that just put him over the top for me. Another adventure photographer I appreciate is a friend of mine, Jonathan Stone, Instagram is @jonathanstone__. He works for Big Sky Resort taking ski photos, and he is stellar at what he does. Also great with landscapes, astrophotography, and drone work. Next up is Griffin Mims, instagram is @griffin_mims. He is an acquaintance from long ago who works with Alpenglow Expeditions. A kid from Nebraska flying in a helicopter through the Himalayas is enough to inspire me any day. His images capture the moment for what it was, and I am honored to know him even slightly.
If you're a wedding and elopement photographer, or just someone interested in the art of storytelling from these events, then I have quite the lineup of photographers to follow. Let me start with a mentor and friend of mine, Callie Lynch. And her Instagram is @callielynchphotography. She is a wonder with color and composition. I admire it very much. Her mentor is Michelle Lyerly - another North Carolina wedding/elopement/family photographer who has a unique way of telling the story. Her Instagram is @michellelyerly. Look at her composition. It's so unique and brave. My biggest inspiration for pursuing photography in the beginning was Anni Graham. And the Insta is @annigraham. I loved her warm tones, which have now shifted a little. Her art ages like fine wine. Her composition will always make her one of the best in the elopement, and luxurious elopement, game. India Earl is another magician with a camera. Instagram is @indiaearl. Probably one of the original elopement photographers, she is a must follow for inspiration. I also admire Laurken Kendall. Instagram is @laurkenkendall. Her in-home sessions with couples have always made me swoon. One of the last wedding/elopement/styled photographers I'll mention is Steph Fisher or @fromthedaises. She is brilliant with her styled shoots and the composition of her photos is so dependent upon the models and setup - which I love. That's all I'll mention for now.
When it comes to family portraits, I love getting unique images of my families and their kiddos. In order to accomplish this I have found it is crucial to just let it happen. Yelling at children to "smile" repeatedly doesn't usually accomplish that result. If you can get the family playing and having fun in a moment together, that creates such special images. Kaley From Kansas and the Insta is @kaleyfromkansas is probably my favorite family and portrait photographer. She does it all, but her family images are incredible. Composition is so singular. A recent discovery is Allie Clarke and the Instagram is @allieclarkephoto. Honestly, those two plus Michelle and Callie previously mentioned, are all I really need for family inspiration.
Now that I've written this all out, I'm quite inspired to work on my own composition as the new year approaches. I hope you find this information inspiring, and maybe helpful too. You can always email me to set up a mentor call as well. I'd love to help you dive in deeper to this line of art. Here's to taking photos with a little pizzazz.
Cheers, Dani :)


Comments